Sunday, May 26, 2013

How to Delete Gmail Account Permanently


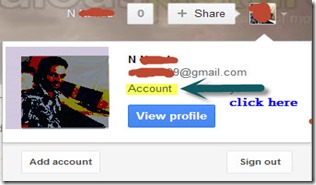
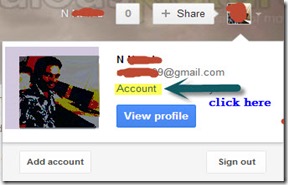
1. Login to your Gmail account. Click on your profile picture and click on Account.

account img

2. Your Gmail account settings will be opened. Here you see Account, Security, Profile & Privacy, Google + and Products.
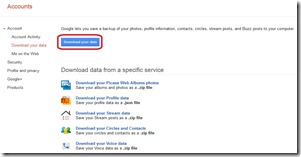
3. Click on Account and under that select “Download Your Data”. Here Click on the Download Button to download all of you Gmail Data.

download data

4. You can individually download your Gmail data like Profile Data, Contacts, Circles data, Picasa web albums.
5. A compressed zip file will be downloaded and save it in your system
6. This is the process to Back up your personnel data before delete your Gmail account.
Now the next process is How to delete Gmail account Permanently.

How to Delete Gmail Account Permanently:

1. Login to your Gmail account and Click on your profile picture.
2. In that click on Account and it will opened account settings.

account img

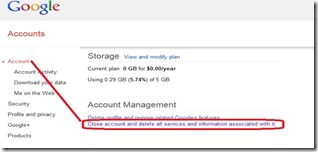
3. Account settings contains the profile information and Account manage settings. Go to bottom of that page and find Account Management.
4. Account management has two options. One is delete profile and remove all Google + features. Next one is close account and delete all services and information associated with it.

delete gmail

5. If you want to reopen your Gmail account in future then select first one. Otherwise choose second option.
6. To delete permanently you need to select the second option that is close account and delete all services information.
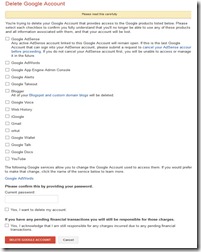
7. It will shows you all the Google features and select all services to delete and enter password and click onDelete Google Account. 

gmail delete

8. This is the process to delete Gmail account Permanently.

Know Your GMAIL Creation Date


1. First login to your Gmail account.
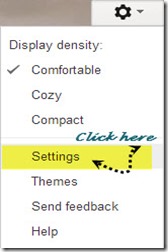
2. Click on Gear symbol for options and in that click on settings.

settings click

3. This settings section contains so many settings about Gmail. Here you go to Forwarding and POP/IMAP.
4. This section contains all settings about configure POP/IMAP access to your Gmail through MS-outlook email client and forwarding settings.
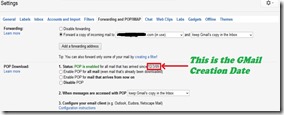
5. Know our work is in the section named POP DOWNLOAD.

pop and imap

6. In this section it shows the POP Status that is enabled or disabled. At that line you will find your Gmail creation date.
7. Here the first line says that “POP is enabled for all mail that has arrived since 12/03/09”. This is your Gmail creation date.
8. Actually what happened is the by default POP is enabled from the date we create our Gmail account. 

Note : Gmail account creation date is important in the situation when you loss access to your account. The Gmail recovery team asks you the Gmail creation date. So every one will know and keep it in a safe place.

Sunday, November 25, 2012

Windows 8 Shortcut Keys


Recently Windows 8(New Operating System) is out in market.Devices running on Windows 8 are emerging more and more day by day.To get the best experience from windows 8 you must be knowing how to use all the functionality properly.Here we listed some quick tweaks and keyboard shortcut keys for windows 8 users.
Windows-8-tweaks-keyboard-shortcuts

1. Enable Num Lock on the Windows 8 Logon Screen

Some user believes that there is a setting in Computer BIOS that num lock will not be enabled automatically on the logon screen. But let's think that you have enabled the user authentication while logon and your password will be in numerical. So, if you want to enter in the Operating System speedily you have to turn first Num Lock On then type, if in case you forget to turn on then password will be wrong. Here is the simple tweak to Enable Num Lock on the Windows 8 Logon Screen.
  • Open "run" (Win Key + R), type "regedit" (without quote) and hit enter.
  • After that one window will appear, as shown in below image.
  • Now Browse to this location: HKEY_USERS\.DEFAULT\Control Panel\Keyboard
  • Then edit the value of InitialKeyboardIndicators and set it to a value of 2.
  • Done successfully.
Enable+Num+Lock+on+the+Windows+8+Logon+Screen

2. Launch File Explorer with Drive List


In Windows 8 and Windows 7, when File Explorer is launched via the Task bar shortcut, Libraries are shown by default, which is not useful to us. But If I show the tweak that when you click on File Explorer via the Taskbar then My Computer opens with a drive list. Here is simple tweak to follow.
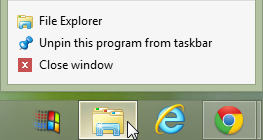
  • Right Click on the File Explorer which is on the Taskbar.
Launch+File+Explorer+with+Drive+List
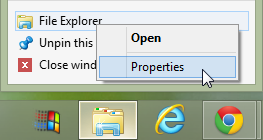
  • Then Select Properties, it will open File Explorer Properties.
Launch+File+Explorer+with+Drive+List1
  • Now change the Target Location to the following:
    %SystemRoot%\explorer.exe ,::{20D04FE0-3AEA-1069-A2D8-08002B30309D}
  • And click OK, you have done successfully.
Launch+File+Explorer+with+Drive+List2

3. Customise Default Programs for the Windows 8 Desktop


In Windows, when you click on any image on the desktop then it will not open in Image Viewer or otherwise if you play a video from a desktop then a full screen player emerges out. To avoid all this things we know that we have to set default programs for that. So, here is the simple tweak:

a) Image Viewers

  • Click on the Windows Key from your Keyboard, type Default Programs and hit Enter.
    Customize+Default+Programs+for+the+Windows+8+Desktop
  •  Select set your default programs.
    Customize+Default+Programs+for+the+Windows+8+Desktop1
  •  Select Windows Photo Viewer and then click set this program as default.
    Customize+Default+Programs+for+the+Windows+8+Desktop4

b) Video Players

  •  Click on the Windows Key from your Keyboard, type Default Programs and hit Enter.
    Customize+Default+Programs+for+the+Windows+8+Desktop4
  • Select set your default programs.
    Customize+Default+Programs+for+the+Windows+8+Desktop5
  • On right hand side, you will see change program option. Click on that button.

Customize+Default+Programs+for+the+Windows+8+Desktop6
  • Select Windows Media Player (Any Player installed in your computer) and then click set this program as default.

    c) PDF Viewer

    •  Click on the Windows Key from your Keyboard, type Default Programs and hit Enter.
      Customize+Default+Programs+for+the+Windows+8+Desktop
    • Select Associate a file type or protocol with a program.
      Customize+Default+Programs+for+the+Windows+8+Desktop5
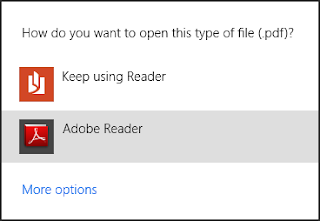
    •  Select .pdf and then click Change program.
      Customize+Default+Programs+for+the+Windows+8+Desktop6
    • Now, select Adobe Reader.
      Customize+Default+Programs+for+the+Windows+8+Desktop7
    In this way, you can set default programs for various of extension.

    4. Windows 8 Multi-Monitor Tweaks


    While designing Windows 8, Microsoft keep the concept of multiple monitors support in mind. If you use multiple monitors then you can do different works on both of them and also works can be finished fast. For that you have to customize and also we have to put different wallpapers on specific monitors. This article is a compilation of multi-monitor tips that will help any Windows 8 power user. 

    a) Taskbar Customization

    Now, right click on Taskbar and select properties. You will see a pop-up properties window and on the bottom half of the Taskbar tab you will see the new Multiple Display options, as shown in below image:
    Windows+8+Multi-Monitor+Tweaks

    There you will see the three options:
    1. All Taskbars
    2. Main taskbar and taskbar where window is open
    3. Taskbar where window is open
    So, select as per your requirement and many others options are also there to customize.

    b) Background Customization

    Windows+8+Multi-Monitor+Tweaks1
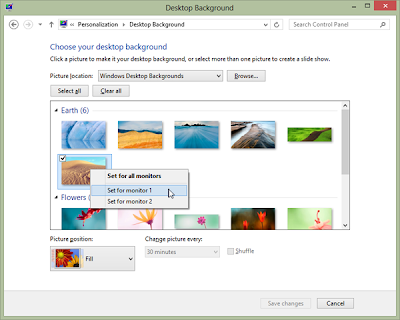
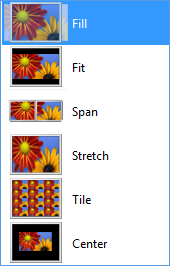
    This is very simple tweak, you have to right click on the specific image and on which monitor you want to display select that. And also select position settings.
    Windows+8+Multi-Monitor+Tweaks2
    You can bring your Windows apps on desktop by dragging with the mouse and also you can switch multiple monitors by pressing Windows Key + Page up / Page down.

    5. Windows 8 Keyboard Shortcut Guide:

    Windows+8+Keyboard+Shortcuts


    Lastly I want to introduce Keyboard Shortcuts so that you can use Windows 8 quickly and efficiently. So, let's useful Keyboard Shortcuts to improve relationship with your new OS.

    General Windows 8 Shortcuts

    Win – Display Start Menu
    Win + Mouse Scroll Wheel – Zoom in and out on the Start Menu
    Win + L – Lock your PC and return to logon screen
    Win + P – Projector options
    Win + X – Admin tools menu
    Win + Enter – Starts Windows Narrator
    Win + (plus sign + ) – Screen zoom in
    Win + (minus sign - ) – Screen zoom out
    Win + Print Screen – Saves a screenshot in the picture library screenshot folder
    Print Screen – Saves a screenshot to clipboard
    Alt + Tab – Classic app switcher
    Win + Tab – Metro app switcher
    Alt + F4 – Close application (Desktop and Metro)
    Tab – Select different items
    Ctrl + C – Copy
    Ctrl + X – Cut
    Ctrl + V – Paste

    Metro / Modern Shortcuts

    Win + C – Displays charms
    Win + Z – Displays app bar
    Win + I – Settings side menu
    Win + K – Devices menu
    Win + H – Share menu
    Win + F – File search
    Win + Q – Application search
    Win + W – Settings search
    Win + (period . ) – Snap Metro app to the right
    Win + Shift + (period.) – Snap Metro app to the left
    Arrow keys + spacebar – Select app tile

    Desktop Shortcuts


    Win + D – Show Desktop

    Win + M – Minimize to Desktop
    Win + R – Run
    Win + T – Taskbar previews
    Win + U – Ease of Access Center
    Win + Pause / Break – System Information
    Win + comma – Peek at desktop
    Ctrl + Shift + Escape – Task Manager
    Win + Right Arrow – Aero snap right
    Win + Left Arrow – Aero snap left
    Win + Up Arrow – Aero snap full screen
    Win + 1 through 9 – Launched applications pinned to the taskbar

    File Explorer Shortcuts

    Win + E – Open File Explorer    

    Ctrl + N – Additional File Explorer window
    Alt + F + P – Open Command prompt at current location
    Alt + F + r – Open PowerShell prompt at current location
    Ctrl + Mouse Scroll Wheel – Change view
    Ctrl + Shift + N – New Folder
    Alt + Enter – Selected File/Folder Properties
    F2 – Rename selected item
    Ctrl + F1 – Show or Hide Ribbon
    Alt + Up arrow – Navigate up a folder
    Alt + Left Arrow – Navigate to previous folder
    Alt + Right Arrow – Navigate forward

    Desktop Internet Explorer 10

    Ctrl + B – Favorites Manager
    Ctrl + D – Add site to Favorites
    Ctrl + I – Favorites List
    Ctrl + G – Feeds
    Ctrl + H – History
    Ctrl + J – View Downloads
    Ctrl + N – New Window
    Ctrl + P – Print
    Ctrl + Shift + P – Open In Private mode tab
    Ctrl + T – New tab
    Ctrl + K – Duplicate tab
    Ctrl + W – Close tab
    Ctrl + Shift + T – Reopen closed tab
    Ctrl + Tab – Switch between open tabs
    Ctrl + R or F5 – Refresh Page
    Ctrl + U – View Source
    Ctrl + F or F3 – Find on page
    Ctrl + E – Move cursor to address bar to search the web
    Alt + Home – Homepage
    Alt + Left Arrow – Back
    Alt + Right Arrow – Forward
    F10 – Menu bar
    F11 – Toggle Full Screen Mode
    F12 – Developer Tools

    Metro Internet Explorer 10

    Ctrl + E – Move cursor to address bar to search the web
    Ctrl + F or F3 – Find on page
    Ctrl + R or F5 – Refresh Page
    Ctrl + P – Print
    Ctrl + T – New tab
    Ctrl + K – Duplicate tab
    Ctrl + W – Close tab
    Ctrl + Tab – Switch between open tabs
    Ctrl + Shift + T – Reopen closed tab
    Ctrl + Shift + P – Open In Private Mode Tab
    Ctrl + L or F4 – Open address bar
    Alt + Left Arrow – Back
    Alt + Right Arrow – Forward

    All above are the useful Tweaks that you should know while using Windows 8. Share this post so that others also can know these Windows Tweaks. If you have any problem related these tweaks then put your comments in below comment box!!!
    Thursday, November 15, 2012

    Send email in Java with gmail SMTP

    Send email in Java with gmail SMTP example.

    MailUtil.java
    1. package mailtest;  
    2.   
    3. import java.io.UnsupportedEncodingException;  
    4. import java.util.Properties;  
    5. import java.util.logging.Level;  
    6. import java.util.logging.Logger;  
    7. import javax.mail.Authenticator;  
    8. import javax.mail.Message;  
    9. import javax.mail.MessagingException;  
    10. import javax.mail.PasswordAuthentication;  
    11. import javax.mail.Session;  
    12. import javax.mail.Transport;  
    13. import javax.mail.internet.InternetAddress;  
    14. import javax.mail.internet.MimeMessage;  
    15.   
    16. public class MailUtil {  
    17.   
    18.     private String SMTP_HOST = "smtp.gmail.com";  
    19.     private String FROM_ADDRESS = "yourname@gmail.com";  
    20.     private String PASSWORD = "yourpassword";  
    21.     private String FROM_NAME = "Sameera";  
    22.   
    23.     public boolean sendMail(String[] recipients, String[] bccRecipients, String subject, String message) {  
    24.         try {  
    25.             Properties props = new Properties();  
    26.             props.put("mail.smtp.host", SMTP_HOST);  
    27.             props.put("mail.smtp.auth""true");  
    28.             props.put("mail.debug""false");  
    29.             props.put("mail.smtp.ssl.enable""true");  
    30.   
    31.             Session session = Session.getInstance(props, new SocialAuth());  
    32.             Message msg = new MimeMessage(session);  
    33.   
    34.             InternetAddress from = new InternetAddress(FROM_ADDRESS, FROM_NAME);  
    35.             msg.setFrom(from);  
    36.   
    37.             InternetAddress[] toAddresses = new InternetAddress[recipients.length];  
    38.             for (int i = 0; i < recipients.length; i++) {  
    39.                 toAddresses[i] = new InternetAddress(recipients[i]);  
    40.             }  
    41.             msg.setRecipients(Message.RecipientType.TO, toAddresses);  
    42.   
    43.   
    44.             InternetAddress[] bccAddresses = new InternetAddress[bccRecipients.length];  
    45.             for (int j = 0; j < bccRecipients.length; j++) {  
    46.                 bccAddresses[j] = new InternetAddress(bccRecipients[j]);  
    47.             }  
    48.             msg.setRecipients(Message.RecipientType.BCC, bccAddresses);  
    49.   
    50.             msg.setSubject(subject);  
    51.             msg.setContent(message, "text/plain");  
    52.             Transport.send(msg);  
    53.             return true;  
    54.         } catch (UnsupportedEncodingException ex) {  
    55.             Logger.getLogger(MailUtil.class.getName()).log(Level.SEVERE, null, ex);  
    56.             return false;  
    57.   
    58.         } catch (MessagingException ex) {  
    59.             Logger.getLogger(MailUtil.class.getName()).log(Level.SEVERE, null, ex);  
    60.             return false;  
    61.         }  
    62.     }  
    63.   
    64.     class SocialAuth extends Authenticator {  
    65.   
    66.         @Override  
    67.         protected PasswordAuthentication getPasswordAuthentication() {  
    68.   
    69.             return new PasswordAuthentication(FROM_ADDRESS, PASSWORD);  
    70.   
    71.         }  
    72.     }  
    73. }  


    Main.java

    1. package mailtest;  
    2.   
    3. public class Main {  
    4.   
    5.     public static void main(String[] args) {  
    6.         String[] recipients = new String[]{"youremail@yahoo.com"};  
    7.         String[] bccRecipients = new String[]{"youremail@gmail.com"};  
    8.         String subject = "Hi this is test Mail";  
    9.         String messageBody = "Test Mail from codesstore.blogspot.com";  
    10.   
    11.         new MailUtil().sendMail(recipients, bccRecipients, subject, messageBody);  
    12.   
    13.     }  
    14. }  
    15.    
    Note: mail.jar  is required.

    Can add multiple recipients and BCC recipients 
    1. String[] recipients = new String[]{"youremail@yahoo.com","youremail2@yahoo.com"};  

    Instead of msg.setContent(message, "text/plain") you can use msg.setContent(message, "text/html") then you can add html tags to message body.